Using WireGuard VPN on a FRITZ!Box without an external DynDNS provider or My!FRITZ account
A while ago, I bought a FRITZ!Box 4060 as my gateway to the Internet. One of its features is WireGuard VPN, a modern VPN protocol known for its simplicity and performance. Before this, I was using OpenVPN on my Synology NAS to connect to my home network, so this WireGuard feature was very welcome.
DynDNS or My!FRITZ account
One thing I found disappointing, however, is that WireGuard on the FRITZ!Box can only be enabled after configuring DynDNS or registering a My!FRITZ account on the device. This requirement ensures that the VPN remains accessible even if your IP Address changes, which makes sense. Still, it would have been nice if there was an option to use your own domain name directly, as I prefer.
Fortunately, there is a simple workaround to do this without an external DynDNS provider, but it’s not very straightforward.
How DynDNS validates a provider
When setting up a DynDNS provider in the FRITZ!Box, all it does is make a simple HTTP GET request under the hood. When this returns 200 OK, the service is considered as valid. We can leverage this mechanism by pointing the FRITZ!Box to a local file, which will return 200 OK.
What is robots.txt and why use it here?
The robots.txt file is a standard used by websites to provide instructions to web crawlers (such as search engine bots) about which pages should or shouldn’t be indexed. It’s typically placed in the root directory of a website and contains simple directives like Disallow to tell bots which parts of the site to avoid.
While the robots.txt file’s primary function is for managing web crawlers, it also has the practical advantage of always being served by a web server and consistently returning a 200 OK response if it’s accessible. This makes it a useful tool in this workaround. Since the FRITZ!Box serves its own robots.txt file locally, we can use it as a guaranteed source of a valid 200 OK response when configuring DynDNS.
Why is this useful?
By pointing the DynDNS update URL to the robots.txt file on the FRITZ!Box, we can trick the device into thinking it has validated a DynDNS provider. This bypasses the need for an external DynDNS service while still allowing us to use WireGuard.
This approach has the following advantages:
- No external service required: You don’t need to sign up for a third-party DynDNS provider or register a My!FRITZ account.
- Guaranteed response: The
robots.txtfile is always available on the FRITZ!Box itself, so the validation always succeeds, ensuring a seamless setup. - Simplicity: This is a simple, local solution that works with minimal configuration.
Setting it up
To set it up, navigate to Internet > Permit Access > DynDNS. Check the Use DynDNS box and fill in the following details:
| Field | Value |
|---|---|
| Update URL | http://192.168.178.1/robots.txt |
| Domain name | Your domain name here |
| Username | foo |
| Password | bar |
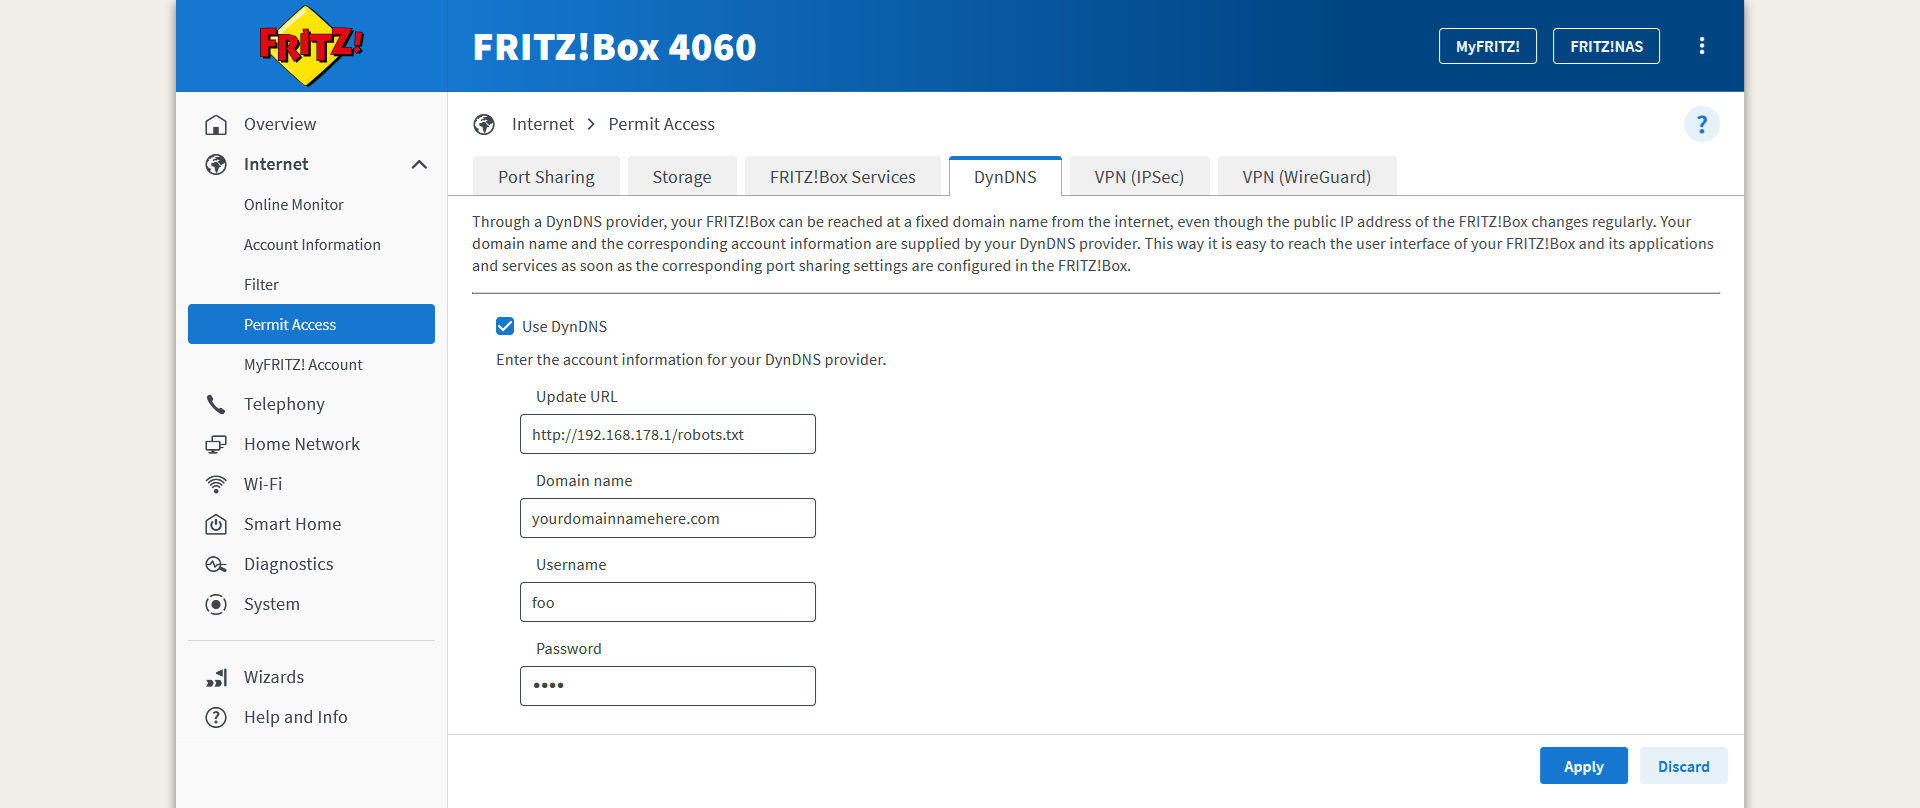
The key field here is the Update URL, which points to the robots.txt file served from the FRITZ!Box itself and provides the 200 OK response needed to validate the DynDNS settings.
Make sure to enter a domain name in the Domain name field that correctly points to your IP Address. If it does not, you may encounter issues when connecting to your VPN once you’ve set it up on your devices.
Note: The Username and Password fields can contain any value, as they are irrelevant in this case.
Once you’ve filled in the details and hit Apply, you should be able to setup WireGuard on the WireGuard tab. That’s it!
Summary
Although it’s not a very intuitive process, you can enable WireGuard on a FRITZ!Box without an external DynDNS provider or My!FRITZ account by using this simple DynDNS validation workaround.
Maybe, at some point, AVM, the company that manufactures the FRITZ!Box, will come up with a more straightforward way to enable WireGuard for people who have their own domain name. Until then, this workaround should work well for most users.